60 Seconds

0


The Story
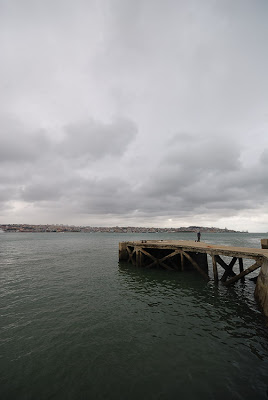
January 2011. After a lousy 2010 in what photo trips concerned, I decided that 2011 would be a return to normality. Nothing better than an one week holiday to get the year started. I had discovered a promising spot in the Seixal Bay, called Ponta dos Corvos. This spot had an abandoned factory and an abandoned shipyard that I decided to explore that day. I packed the gear and, after a quick lunch, I went there. It was an overcast day and when I approached Ponta dos Corvos I soon discovered that the road there was a perfect adventure: more holes than road and all of them filled with water. If I only had an 4x4 :) That, the almost raining weather and the insecurity of the spot cut my trip short.
Still it was very early in the afternoon and I couldn't throw that sky away that easily. After a short thinking, I decided to head to Cacilhas and try some long exposures in broad daylight.
I parked in the Cais do Ginjal and started to re-explore the place. After some photos, I decided to try this one. I mounted the tripod and the ND filter and gave it a try. I took half a dozen shots and the afternoon was already over - that's something typical when I do long exposures.

Equipment / Technical Info
Nikon D80
Sigma 10-20mm F4-5.6 EX DC
Hitech 85 ND 3.0 filter

60/1 second
F/9.0
13 mm
100

Original Photo


Post Processing
This photo was my first choice from that day. I imported it into Lightroom, removed some dust spots and then applied the automatic Lens Correction for the Sigma 10-20 lens. Then I slightly increased the Exposure, the Black Clipping and duplicated the Contrast. As the river was too dark, I applied an inverted Graduated Filter to the bottom and the reduced the Exposure again. Pushed the Contrast even upper, increased the Clarity to 60 and Converted to Black And White. There I increased the Blue Gray Level - at the moment, my idea was to apply a similar treatment to the one used in 233 seconds. But then I decided to try to decrease the Exposure a lot to have the opposite effect - a very dark look, instead of the brighter one in the other photo - I preferred the way the photo looked that way . I increased the Sharpening and the Black Clipping and then re-adjusted the Brightness - it was too dark. As the vignetting created by the filter holder started to show in the upper left corner, I Cropped it out. The I added another Graduated Filter, this time to darken the sky a little, made small adjustments to the Exposure and Brightness and applied my custom Split Tone preset.
It was ready. I published the photo to the usual sites and after some critiques that mentioned lack of contrast and that the photo was too dark, I decided to fix that issues. I changed the Point Curve to Strong Contrast and increased the Exposure a little.

Final Photo


Link to image
http://jpgmn.deviantart.com/art/60-Seconds-192438666
Read more

Cais do Ginjal II

0


The Story
June, 2009. It was summer time but it didn't felt like it (check
The Pier photo story for more details)...
One of the perspectives that I was looking for was this one: the deck in the left, the 25 de Abril bridge in the back and Lisboa on the right. In the middle, the pier, like a serpent in the river.

Equipment / Technical Info
Nikon D80
Sigma 10-20mm F4-5.6 EX DC

Shutter Speed: 1/100 second
F/8.0
10 mm
100

Original Photo


Post Processing
This photo was one of my first choices. Later back home I regret that I didn't took the tripod and the 10 stop filter, it was the ideal shot.
So I imported the photo into Lightroom and started playing around with the filters. Honestly, I didn't know how to process this one. My first reaction was: let's convert it to B&W. But I didn't liked the result so I started messing around with the settings to get something out of it.
So, I started by adding a Gradient Filter to the sky to darken it a bit. Then, I increased the Vibrance, the Fill Light, the Contrast and the Exposure. Next step was the White Balance. I wanted to get a more warm feeling, but not too warm because the pier itself was becoming too orange and the river too green. So I reduced the Saturation on the Oranges and on the Greens to compensate the WB adjustment. That was it for Lightroom. Let me stress that I was completely playing around with the settings, not knowing where I was going to. I was just looking for something that would catch my attention.
In CS4 I've done: Auto Tone, Auto Contrast, Auto Color and Auto Levels, then reduced the Vibrance and applied the "Tobacco Grad (125)" action to the sky (you can find this and other actions to simulate the effect of Gradient filters here: http://www.thelightsrightstudio.com). This gave me the full size (10Mp) final image.
I usually publish my photos with 1024px in the largest size and use a great Photoshop action by Manyk to do the re-size. You can find it here: http://manyk.deviantart.com/art/Web-Sharpening-with-Photoshop-29038461
I was not quite satisfied with the final result: it was a bit too unreal for what I was looking for. But after some time it started to grab my attention so I decided to publish it.

Final Photo


Link to image
http://jpgmn.deviantart.com/art/Cais-do-Ginjal-II-127703569
Read more

The Pier

0


The Story
June, 2009. It was summer time but it didn't felt like it. The day was very cloudy, almost rainy. A few days before I've been scouting a spot near my home that I thought would give a good photo: the former Lisnave shipyards, in Cacilhas, Almada on the south bank of Tagus river. In the day I went there for the first time, I found a good place to shoot the Lisnave site, from a higher ground, but the day was sunny, so I left it for another proper day. That proper day had arrived: the sky was covered with clouds.
I picked the gear and went to Cacilhas take the shot. After a couple shots there I remembered that I hadn't properly explored the Ginjal pier in Cacilhas. So I parked in the pier and started exploring the site. This pier is next to the ferry that connects to Lisboa and it is about 2500 feet (750m) long. It is filled with abandoned houses and warehouses and some not abandoned ones. I took plenty of shots, trying to get new perspectives, and this one was one of my last photos there. Less than five minutes after this shot, it started to rain a lot so this photo trip was over.
A few perspectives were missing, so I'll return there someday.

Equipment / Technical Info
Nikon D80
Sigma 10-20mm F4-5.6 EX DC

1/100 second
F/8.0
10 mm
100

Original Photo


Post Processing
Back home, this photo wasn't, surprise, surprise, one of my first choices :) Only almost one week after, I decided to give this photo a chance. My first thought was to find a way to darken the clouds and give it a more dramatic look.
I imported it into Lightroom and adjusted the perspective with a proper Crop. I've added a Graduated Filter to darken the sky and lighten the river. Then, I've increased the Exposure, the Contrast, the Fill Light, the Clarity and the Sharpening. I wasn't fully satisfied so I started playing around with the presets. I ended up choosing the "Civil War 2" preset by Vidular (you can find it here: http://www.flickr.com/photos/vidular/2456010834/). After the preset, I've lightened the pier base with a brush so that it would show more detail.
In CS4, I've done: Auto Tone, Auto Contrast, Auto Color and Auto Levels. Then I converted to Black and White (Green Filter preset) and increased the Vignetting to the maximum. Finally, I've warmed the photo a little with the "Warm (26)" action from TLR (you can find this and other actions to simulate the effect of Gradient filters here: http://www.thelightsrightstudio.com).
This gave me the full size (10Mp) final image.
I usually publish my photos with 1024px in the largest size and use a great Photoshop action by Manyk to do the re-size.
You can find it here: http://manyk.deviantart.com/art/Web-Sharpening-with-Photoshop-29038461

Final Photo


Link to image
http://jpgmn.deviantart.com/art/The-Pier-128186829
Read more

Palafitico

0


The Story
For some time I've seen great photos of a place where we can see wooden piers and small fishing boats lost in a maze of walkways. I've never tried to discover where this place was because I always assumed that it wasn't in Portugal, or if it was, it should be very far away.
One day I was chatting with a friend that also is a photographer about a spot I found very near my home. This spot is an old boat shipyard turned into a boat cemetery. In the middle of the conversation he asked me if I knew a place called Carrasqueira do Sado. I've never heard anything about it but went googling for it. For my surprise this place was the place where all those great photos were taken. Better yet, that place wasn't that far away from my home, it was possible to go there some weekend.
Carrasqueira do Sado is a small place near the touristic spot of Troia, in the Sado river delta. The trip there is a bit lengthy (about 100 Km - 62 miles - from my home) so I left it to a better time (we were somewhere around January and the days were still a bit short).
In the beginning of March, 2009 I talked with my wife and convinced her to go there one Sunday. We get to the car, head straight to Alcácer do Sal (a town nearby) to have lunch. After lunch we stopped by Carrasqueira do Sado in our way to Troia.
In Carrasqueira do Sado we found the Cais Palafítico directions and when we got there it seamed to be just another fishing dock... but in the middle of the mainland. We parked, I picked up the gear and went discovering the place.
It really is a wooden walkways maze, with small wooden houses on the sides, lots of fishing nets and boats laying there. In that day there was a low tide and a strong sun (it was about 3 pm - a terrible photo hour). The idea was just to explore the place and get back more in the afternoon to get the sunset, but I started to try some shots and we took a little longer than I expected. I was also a bit uncomfortable with the fisherman's looking at us, invading they're place. So I decided to just take the photos in that moment and leave to another day, perhaps with another company, to return to capture the sunset.

Equipment / Technical Info
Nikon D80
Sigma 10-20mm F4-5.6 EX DC
Hitech 85 ND 0.9 GRAD SE filter

1/80 second
F/9.0
12 mm
100

Original Photo


Post Processing
As always, when I got home from this trip, I went straight to the computer to check the results and pick some photos to publish. I took few photos there and wasn't too much satisfied with them. I picked a few, this one included, and this was probably my first choice.
I started playing around with the Lightroom presets I have and ended using a custom preset from some other photo of mine that was itself already based on another preset from Mike Lao (you can find it here: http://inside-lightroom.com/?page_id=11) - 300 V1.
After applying the 300 preset, I've converted to grayscale and played around with gray levels. I mainly darkened the blues, but also made slight adjustments to the other levels.
Then I decreased the Fill Light and the Vignetting, added some Graduated Filter, increased the Exposure, Recovery and Clarity.
And that was it for Lightroom. I then exported it as a PSD file and opened it in CS3.
In CS3, I've just saved it as JPEG. This gave me the full size (10Mp) final image.
I usually publish my photos with 1024px in the largest size and use a great Photoshop action by Manyk to do the re-size.
You can find it here: http://manyk.deviantart.com/art/Web-Sharpening-with-Photoshop-29038461
My first impression of the finished photo was: I don't like it, it is too "dirty" (I can't find another word for it - it looks weird, with low resolution and a high contrast). But I had just made over 200 km and couldn't accept that there wasn't one single photo to show. I called my wife and showed her the photo. She loved it! I couldn't understand it... I don't like the photo and she loves it?
Well, it was a very sad world if everyone liked the same :)

Final Photo


Link to image
http://jpgmn.deviantart.com/art/Palafitico-115298876
Read more
 
Design by BloggerThemes