60 Seconds

0


The Story
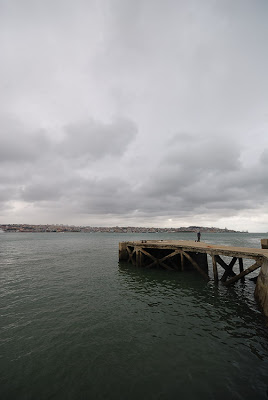
January 2011. After a lousy 2010 in what photo trips concerned, I decided that 2011 would be a return to normality. Nothing better than an one week holiday to get the year started. I had discovered a promising spot in the Seixal Bay, called Ponta dos Corvos. This spot had an abandoned factory and an abandoned shipyard that I decided to explore that day. I packed the gear and, after a quick lunch, I went there. It was an overcast day and when I approached Ponta dos Corvos I soon discovered that the road there was a perfect adventure: more holes than road and all of them filled with water. If I only had an 4x4 :) That, the almost raining weather and the insecurity of the spot cut my trip short.
Still it was very early in the afternoon and I couldn't throw that sky away that easily. After a short thinking, I decided to head to Cacilhas and try some long exposures in broad daylight.
I parked in the Cais do Ginjal and started to re-explore the place. After some photos, I decided to try this one. I mounted the tripod and the ND filter and gave it a try. I took half a dozen shots and the afternoon was already over - that's something typical when I do long exposures.

Equipment / Technical Info
Nikon D80
Sigma 10-20mm F4-5.6 EX DC
Hitech 85 ND 3.0 filter

60/1 second
F/9.0
13 mm
100

Original Photo


Post Processing
This photo was my first choice from that day. I imported it into Lightroom, removed some dust spots and then applied the automatic Lens Correction for the Sigma 10-20 lens. Then I slightly increased the Exposure, the Black Clipping and duplicated the Contrast. As the river was too dark, I applied an inverted Graduated Filter to the bottom and the reduced the Exposure again. Pushed the Contrast even upper, increased the Clarity to 60 and Converted to Black And White. There I increased the Blue Gray Level - at the moment, my idea was to apply a similar treatment to the one used in 233 seconds. But then I decided to try to decrease the Exposure a lot to have the opposite effect - a very dark look, instead of the brighter one in the other photo - I preferred the way the photo looked that way . I increased the Sharpening and the Black Clipping and then re-adjusted the Brightness - it was too dark. As the vignetting created by the filter holder started to show in the upper left corner, I Cropped it out. The I added another Graduated Filter, this time to darken the sky a little, made small adjustments to the Exposure and Brightness and applied my custom Split Tone preset.
It was ready. I published the photo to the usual sites and after some critiques that mentioned lack of contrast and that the photo was too dark, I decided to fix that issues. I changed the Point Curve to Strong Contrast and increased the Exposure a little.

Final Photo


Link to image
http://jpgmn.deviantart.com/art/60-Seconds-192438666
Read more

233 seconds

0


The Story
December, 2009. The year was coming to an end and our life was about to get a U-turn very soon with the birth of our daughter. The photo trips were very few in that time and this one was to be the last one, for some time. I've already had been to Cais do Ginjal in Cacilhas and had taken some good photos there (like:
The Pier and Cais do Ginjal II). This time I was about to try to capture a long exposure of the Tagus River during day time.
I picked the gear plus the tripod and we headed to Cacilhas. I miscalculated the hour and the remaining daylight available. This kind of photos take some time to capture: with preparing time and Long Exposure NR after, a 4 minutes exposure (like this one) takes about 10 minutes.
My wife stayed in the car while I went to the piers to get a good perspective. I knew that the Sun was setting too fast and I would only have a couple tries, at most. This photo was my first one. I picked a pier that would give me a good view over Lisboa, prepared the tripod and took a test run shot. This test run shot is useful to check the perspective and the exposure variables, and to later on compare with the long exposure shot. A couple test shots later I got a good perspective and calculated the exposure time, considering the 10 stops (as I mentioned previously in Rossio photo story, I multiply the exposure time by 1000 and round it upper).
With almost everything in place, I placed carefully the filter holder with the ND filter on it. Now it was time to a very important step: cover the filter holder so no light would come into the lens from anywhere else than the filter itself. For this I used the upper side of a black sock. I cut the elastic area of it, what gave me a dark tissue ring that fits perfectly in the filter holder.
With all set, I used the IR remote to start the exposure in bulb mode and counted 3 minutes. As the night was coming fast and my last tries at this hour of the day went not that good, I decided to increase one more minute to the calculated time. So, almost 4 minutes exposure would be enough, but I would have to wait another 4 to check the result (tip: in long exposure shots, almost every camera have a setting turned on by default - and should remain that way 99% of the times - to reduce the noise produced by the overheating of some pixels in the camera sensor. What the camera does is, after taking the photo, it closes the shutter and takes another shot with the same duration. The point is that the pixels that overheated the first time, will overheat in this second time. Then, the camera processor can compare both shots and remove this "hot" pixels.).
After this shot, I tried another one, 10 minutes long, that didn't came out very good because it was already dark. So, it was a small photo trip that took about 45 minutes and only gave me time to take two photos :)

Equipment / Technical Info
Nikon D80
Sigma 10-20mm F4-5.6 EX DC
Hitech 85 ND 3.0 filter
Slik Pro 340DX tripod

233/1 second
F/9.0
13 mm
100

Original Photo


Post Processing
Back home, I went to inspect the two photos taken that late afternoon. The second one was too dark and I tried to get some of it in post processing because it was my favorite in terms of perspective. I failed to "fix" it so I would had to return there another day.
In this one, I first tried to fix the colors to see if it would surprise me but ended up with the black and white. What I've done was the following.
I imported the NEF into Lightroom and started by aligning the horizon and cropping it to my like. Then applied some Highlight Recovery and added a Graduated Filter to darken the sky. Increased the Exposure by one stop, reduced the Vignetting that resulted from the filter holder and converted to Grayscale. Then I adjusted the Gray levels on the Blues (up), Purples (down), Aquas (up) and Yellows (down); boosted the Clarity to 100%, re-increased the Exposure by half a stop and increased the Blacks to 35%. Finally, I updated the Graduated Filter exposure to darken the sky even more and increased the Fill Light.
In CS4, I've simply reduced the noise and applied an Auto Levels.
I kinda liked the result but knew that there were a long road ahead in this kind of photography.

Final Photo


Link to image
http://jpgmn.deviantart.com/art/233-seconds-148090938
Read more

Cais do Ginjal II

0


The Story
June, 2009. It was summer time but it didn't felt like it (check
The Pier photo story for more details)...
One of the perspectives that I was looking for was this one: the deck in the left, the 25 de Abril bridge in the back and Lisboa on the right. In the middle, the pier, like a serpent in the river.

Equipment / Technical Info
Nikon D80
Sigma 10-20mm F4-5.6 EX DC

Shutter Speed: 1/100 second
F/8.0
10 mm
100

Original Photo


Post Processing
This photo was one of my first choices. Later back home I regret that I didn't took the tripod and the 10 stop filter, it was the ideal shot.
So I imported the photo into Lightroom and started playing around with the filters. Honestly, I didn't know how to process this one. My first reaction was: let's convert it to B&W. But I didn't liked the result so I started messing around with the settings to get something out of it.
So, I started by adding a Gradient Filter to the sky to darken it a bit. Then, I increased the Vibrance, the Fill Light, the Contrast and the Exposure. Next step was the White Balance. I wanted to get a more warm feeling, but not too warm because the pier itself was becoming too orange and the river too green. So I reduced the Saturation on the Oranges and on the Greens to compensate the WB adjustment. That was it for Lightroom. Let me stress that I was completely playing around with the settings, not knowing where I was going to. I was just looking for something that would catch my attention.
In CS4 I've done: Auto Tone, Auto Contrast, Auto Color and Auto Levels, then reduced the Vibrance and applied the "Tobacco Grad (125)" action to the sky (you can find this and other actions to simulate the effect of Gradient filters here: http://www.thelightsrightstudio.com). This gave me the full size (10Mp) final image.
I usually publish my photos with 1024px in the largest size and use a great Photoshop action by Manyk to do the re-size. You can find it here: http://manyk.deviantart.com/art/Web-Sharpening-with-Photoshop-29038461
I was not quite satisfied with the final result: it was a bit too unreal for what I was looking for. But after some time it started to grab my attention so I decided to publish it.

Final Photo


Link to image
http://jpgmn.deviantart.com/art/Cais-do-Ginjal-II-127703569
Read more

The Pier

0


The Story
June, 2009. It was summer time but it didn't felt like it. The day was very cloudy, almost rainy. A few days before I've been scouting a spot near my home that I thought would give a good photo: the former Lisnave shipyards, in Cacilhas, Almada on the south bank of Tagus river. In the day I went there for the first time, I found a good place to shoot the Lisnave site, from a higher ground, but the day was sunny, so I left it for another proper day. That proper day had arrived: the sky was covered with clouds.
I picked the gear and went to Cacilhas take the shot. After a couple shots there I remembered that I hadn't properly explored the Ginjal pier in Cacilhas. So I parked in the pier and started exploring the site. This pier is next to the ferry that connects to Lisboa and it is about 2500 feet (750m) long. It is filled with abandoned houses and warehouses and some not abandoned ones. I took plenty of shots, trying to get new perspectives, and this one was one of my last photos there. Less than five minutes after this shot, it started to rain a lot so this photo trip was over.
A few perspectives were missing, so I'll return there someday.

Equipment / Technical Info
Nikon D80
Sigma 10-20mm F4-5.6 EX DC

1/100 second
F/8.0
10 mm
100

Original Photo


Post Processing
Back home, this photo wasn't, surprise, surprise, one of my first choices :) Only almost one week after, I decided to give this photo a chance. My first thought was to find a way to darken the clouds and give it a more dramatic look.
I imported it into Lightroom and adjusted the perspective with a proper Crop. I've added a Graduated Filter to darken the sky and lighten the river. Then, I've increased the Exposure, the Contrast, the Fill Light, the Clarity and the Sharpening. I wasn't fully satisfied so I started playing around with the presets. I ended up choosing the "Civil War 2" preset by Vidular (you can find it here: http://www.flickr.com/photos/vidular/2456010834/). After the preset, I've lightened the pier base with a brush so that it would show more detail.
In CS4, I've done: Auto Tone, Auto Contrast, Auto Color and Auto Levels. Then I converted to Black and White (Green Filter preset) and increased the Vignetting to the maximum. Finally, I've warmed the photo a little with the "Warm (26)" action from TLR (you can find this and other actions to simulate the effect of Gradient filters here: http://www.thelightsrightstudio.com).
This gave me the full size (10Mp) final image.
I usually publish my photos with 1024px in the largest size and use a great Photoshop action by Manyk to do the re-size.
You can find it here: http://manyk.deviantart.com/art/Web-Sharpening-with-Photoshop-29038461

Final Photo


Link to image
http://jpgmn.deviantart.com/art/The-Pier-128186829
Read more
 
Design by BloggerThemes